Thursday, December 29, 2011

Holiday makeover

Happy Holidays to Everyone!! Hope you enjoyed it as much as we did. 
We were lucky enough to be hosted by both families this year, but we did plan a dinner party post Christmas for our friends and neighbours.  We live on a great street in a wonderful neighbourhood and are happy to call many of our neighbours friends. 

So when it came time to host I had a look at the tired old dining chairs and decided there was no time like the present to recover them..."present" as in the morning of the dinner party.

I had picked up some really great burlap coffee sacks from a coffee shop and had been waiting to use them.
I thought they would look great as covers on our dining chairs.  The fabric is durable and each one is unique in design and colour.

Covering chair pads is relatively easy if you have a few key tools.  You really only need scissors and a good heavy duty staple gun and then screws to attach the pad to the frame.


Once you have detached the pads from the chair frame you will need to pull off the old fabric.  I realized I had done this project way too many times when I saw how many layers of fabric were on our seats!!  It is best to get the pad down to the base so that you don't have too much thickness of old fabric to deal with.  Take special care with loose staples and tacks.

Next, lay the cushion upside down on the fabric.  Make sure the pattern is on the bottom and is facing the correct way that you will want it once it is finished.  Cut the fabric so that you allow enough to wrap up and around the sides with enough overlap to work with.  Be generous as you can always cut fabric down to size and nothing is more frustrating than having cut it too small and wasting the piece.  "Measure twice, cut once" certainly applies here.


Then just start on one side and firmly wrap the fabric onto the backing and staple into place.  I start on one side, then go to the opposite side and keep the tension on the fabric so you will get a nice tight fit.  When you are working in the corners, staple to the ends and then wrap the corner piece and staple it up.  Once it is secure, cut off the excess overlapping fabric for a neat corner.

Continue this on all sides and on all pads til they are done.  Then secure them to the chair frame with screws that are long enough to grip into the pad, but not too long as to go through the padding.

Voila!  In a very short time you can completely change the look of the chairs and add interest to your dining room. 

I love these because now each chair is different and unique yet they all work together well.  You can use any fabric for this project as long as it is durable enough to use for upholstery.

The dinner party was great and the chairs were a hit!

Wishing you all a very Happy Holiday and best wishes for a wonderful 2012!!

Monday, December 19, 2011

Stumped for Ideas?....

I get inspiration from many different things.  From looking at magazines, websites and blogs.  From walking around the city and seeing new shops, displays and products.  What I sometimes notice is that everything I have wanted to make or design has already been done.  Which can be discouraging sometimes.  With so much sharing of ideas and so much available to be seen out there from all over the world now it is almost impossible to come up with a completely different idea.


But then I realized that, although there are no true "original" ideas, you can make a piece unique and put your own original twist on it.  It is how you treat the material or how you execute the idea and design that make it unique to you.  Just as a song will never ever be played the same way twice, even by the same musician, making something by hand that is the same or similar will always have its own different characteristics.  And it is these small differences that make that item special and interesting.

I find that the best and most exciting inspiration comes from my materials.  That is why I love so much to take salvaged items and bring them back to life.  They have their own personality that often inspires me to use them in a certain way. 

I found a slice of wood on the boardwalk one day... once again while running which tends to be a great way for me to find things!  The city was taking down several trees that were old and diseased and they had obviously made two cuts to fell the tree and this little wedge was left over.

So I carried it home with me while running...yes I looked ridiculous....and let it dry in the basement for several months.

I sanded it down, which took quite a while because it was so roughly cut, and then put a coat of oil on it.  Because I knew I wanted to perhaps serve food on it I used a lemon oil based product that is safe to use in the kitchen.
I bought this at Restoration Hardware several years ago and it is fantastic.

I left the bark on the outside which is referred to as "live edge".  The end result is a really beautiful and unique board for serving cheese on, displaying candles, serving a cake on....you get the idea.  I will definitely use this over the holidays when we are entertaining. 


Happy Holidays!! And Happy Entertaining!!

Tuesday, December 13, 2011

The Lengths I will go to.....

People often ask me where I get all my materials from to make my furniture and home decor items.  Most of the time it is research, searching, scrounging, garbage picking and knocking on doors (virtual and literal)....but today it was good old fashioned thievery!!!


There is a development happening down the street from my son's school and I pass by it each day at least twice.  Four homes have been slated for tear down since the project was posted and I have been scoping, lurking, stalking and creeping the street ever since.  I have harassed the foreman, real estate agent, dump truck driver and the guys who were only building the "keep out" fence.  With very little luck.  I have been asking if it would be okay to come in and have a look to salvage anything from the homes.  No.  I asked if they could grab the doors for me and leave them outside.  No.  I asked about the posts from the front porch of one of the houses and "could I have it please?"  No.  It may not have helped that most times I asked them I was in old sweaty running gear with hair sticking up.  I contemplated coming back in something a little nicer with maybe a 24 of beer under my arm to sweeten the deal but I have my limits.  So today as I was walking past with a friend and our dogs I saw that they had bulldozed the entire block of houses!!

They were all there yesterday and this morning....gone.  I went over to peer through the fence and saw piles of great old wood, some doors and just tons of junk.  Then....my eyes wandered to just in front of the huge pile.  There, all on its own, lay 1 solitary post from one of the houses that I had my eye on all these months.  I don't know whether some kind soul separated it from the rubble for me or whether it was divine intervention.  Whatever the case...it was GAME ON.  My friend held my dog (thanks Mare, partner in crime and general egger-onner) and I snuck inside a small opening in the fence....grabbed the column and ran like heck!!!

I was gleeful!! Partly for the thrill of the find, and partly for the good old fashioned feeling of making away with it.


I don't know what I am going to do with it yet, but I am pretty happy about scoring this find! 

Part of what I love about making things from salvaged goods is the story behind the items.  I often wonder whose hands opened the windows, and who walked through those doors...for this piece I will forever remember my sprint away from the scene of the crime.  As for the cost of the post....it was an absolute steal!!


Monday, December 5, 2011

Wait a Minute Mr. Postman...

I recently finished a project using some of my newly acquired hardware.  A parent on my son's hockey team commissioned me to make him a mailbox out of old barnboard.  He had all the dimensions and a rough drawing and from there I came up with the design.

I knew I wanted it to be quite rustic and on my last trip to see Ed my hardware guy (see previous post), I picked up some great hinges for this project.

I measured, drew out and cut the pieces of barnboard.  Then I started planning on how I was going to join the pieces to not only be strong and durable but to look great.  My preferred method is wood glue and screws (when you clamp the pieces together with the glue and then screw them together, the result is a very strong joint that is tidy as well).  The only problem then becomes how to hide the screw heads.


There are several different ways of doing this.  If you are going to be painting a piece, you can putty the holes, sand and paint and they will disappear.  But since I was leaving the barnboard exposed I needed a more inventive method.  I could have used wood plugs, or wood buttons. 

 I found these online at Lee Valley.  But they were both too costly and too "sparkly" new for my liking.

I wanted something a bit more unique and rustic.  Again I contacted Ed and discussed it with him.  Once again he assured me if I came up he could help me find a solution.  We looked at several different ways of covering them and the method I liked best was to plug the holes with wood buttons first, then hammer a metal tack ontop of that.


I had to countersink the screw (basically set it deep into the wood) and then drill a hole big enough for the wood button and glue it into the hole.  Then I hammered the metal tack into that forming a strong and decorative cover for the screw hole.

It took a bit longer than a simpler method, but I like the way it looks and is in keeping with the rustic feel of the mailbox. 


Here is the finished product...What do you think?


Thursday, November 24, 2011

Hardware....The Jewellery of Furniture

As you may know by now from reading the blog, I like things old...and beaten up...and recycled....and preferably at a good price.   I love fixing up old things, or cutting up old things and making them into new, funtional pieces of furniture or accessories.  When I am fixing up a piece I usually try to maintain the character of it, or if I am building a new piece from old materials I like to add old hardware.

Hardware is something that I have a passion for.  I love metal, especially if it is old and rusty, and think it is a great way to change the look of a piece.  It is the "jewellery" of furniture and can add so much for a relatively low cost.  You can change the feel and look of something just by changing the hardware.  Adding new and modern hardware is a great way to streamline an older piece.  Using older hardware can add so much character to a newer piece of furniture.

Restoration Hardware is one of my favourite go-to places for style and ideas.
www.restorationhardware.com

This company started in California in 1980 when the founder Stephen Gordon was having a tough time finding hardware while restoring his own home.  The first shop was run out of his house!

With so many people renovating older homes and trying to keep the integrity of the home alive it is no wonder the company has done so well.

So in my travels I always try to pick up pieces of interesting hardware for projects.  While in Port Perry at an Antique shop, I asked if he had any hardware and he said no but told me I had to go see Ed in Stouffville.  He showed me his ad with the phone number and email address and I thanked him.

I sent an email to Ed saying I would love to come check out what he has for sale.  He called me right back and described it as a small business that came out of a hobby.  He said he was sure I would find something to suit.  What an understatement!!

When I first approached the house and shop buildings, I was really excited.  It was just my kind of place.  The "Shop" was in a barn painted red with tons of stuff lying around outside.

I walked inside and nearly fell over.....the place was filled with hardware of all shapes, sizes, designs and styles. 


 This is just a small sampling of what Ed had in that barn!!

I finally met Ed and he was warm, friendly and knew his stuff.  He had been collecting for years.  He had been a cabinet maker and restorer so he had started out by trying to source hardware for his own furniture.  It obviously was an ambitious hobby because it now filled over 6 rooms with his goods.  I saw some rough wood and tin ceiling and asked him if he had any more.  He told me he had lots in the basement.  So down we went and again, my mouth dropped open.  Every corner was filled with old wood, tin, more hardware and some antiques mixed in.  Doors, windows, you name it he had it.

He showed me to the tin ceiling and I fell in love...he had several long pieces which are more rare (the typical is 2 foot x 2 foot squares.....he had a piece that was 2 feet by almost 6 feet) and so after much moving of stuff and heaving of piles I had my tin.


It has lots of peeling paint which reveals a greenish paint beneath, and then beneath that rusted tin...it is really rustic and is the perfect size and shape for our main floor powder room ceiling.  More on how that turns out when it's done.

I also ended up getting some wood corbels - corbels are used as supports or decoration.  These I am going to use in making a shelf for either my friend or to sell.


I also got some half-moon pulls to use on my chalkboards/corkboards.  I am going to mount them upside down to hold the chalk and push pins - a great way to re-purpose old hardware.  And I picked up 2 old rustic hinges to use on a mailbox I am making out of barn board. 

This was definitely a trip worth taking.  I could have spent hours there looking for treasures.  Ed was so accommodating and told me if I have any projects in mind to just call him or email him and he will look for pieces for me.  It was a pleasure to meet him and I have a feeling he is going to be my new BFF.  If you live in the GTA and need hardware or any old salvaged materials you need to pay him a visit.  He is open by appointment only, but is so welcoming and can almost always accommodate you.   Just call ahead or email him.

One thing I must note....the shop isn't heated and with winter coming you definitely need to dress warmly because you will certainly be there a while with all the treasures he has.

I am going to have lots to post with all these new materials!  Thanks Ed!

Sunday, November 20, 2011

From "Saw" to "Sew"

This summer I bought myself a little something special....a new table saw.


  Some women buy shoes, I buy tools....it's a bad habit.  Once I bought the new saw I realized I would need to clear space in my already crowded workshop for it.  I had my father's old table saw with wooden base.  It still worked but wasn't reliable and was as old as I am so it was time to get rid of it.  We unhooked the saw from the base (it was hardwired onto it) and set it out at the curb...it was gone in a couple of hours.  I was going to get rid of the wooden base too, since I couldn't think of how to reuse it, but couldn't quite bring myself to part with it.


It was in rough shape but had great storage and also some sentimental attachment since it was at this very table I started to make many projects when I was in high school (did I mention I didn't have much of a social life??).

I realized I could use it in my office/sewing workroom and it would be perfect there.  All I needed was some wood for the top.  As I was coming back home after my morning run in the rain, I spied some wood leaning against a tree on a neighbour's yard.  There, in the middle of the pile, was a slab of solid pine...honestly I have the best luck sometimes!  I knocked on the door just to make sure it was up for grabs and the owner gladly told me to take it, as well as some other pieces of wood too....I also scored a great office chair she was only too happy to be rid of.


What a score!!
 
I took the slab of wood home and set it on top of the wooden saw base.  It fit perfectly!!  I decided to paint it a nice blue grey colour to go with the top.  I really didn't need to do much other than clean it up, add a new face to the large center drawer and attach the new top.


Since the old table saw had been hardwired to the base, I had the old switch and plate.  I loved how it looked and decided to add it to the center drawer as an accent and an homage to the history of the piece.


I love it, and it stores all my sewing equipment perfectly!

Another successful curbside shopping experience.

Monday, November 14, 2011

How a Door Becomes a Table...

One of my projects for a client was to transform a door into a dining room table.  I acquired the door from a friend who had been keeping an eye out for me on trash day.  It was a lovely solid wood door in original condition, having never been painted. 


The only question now is what to use as the base?  I had some old timbers from a barn up north and wondered if I could somehow use those as legs or trestle.

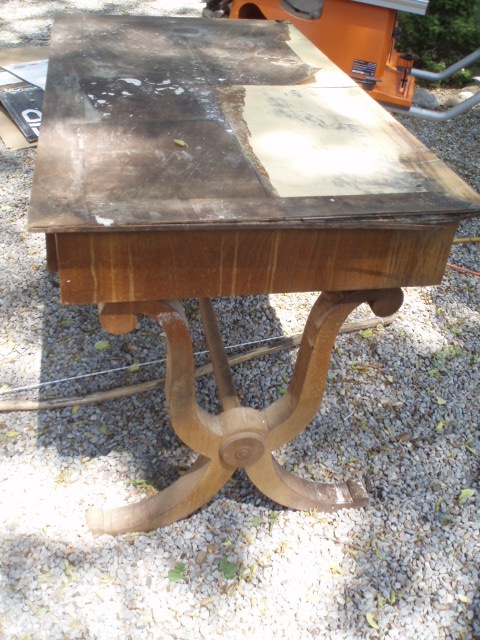
As often happens, just as I am trying to find the right solution to a problem, the solution presents itself.  This time it appeared in front of me on the way down the street for my morning run.  Smack in the center of the sidewalk in front of me stood an old table.  The top was in really rough shape...it had obviously been left out in the rain too long....but the base was salvageable.


It had two drawers that would be great storage for flatware and I liked the lines on the legs.  The center dowel was cracked though and I thought I would have to repair it if it was to be strong enough to hold the door's weight.

The veneer on the legs was peeling and I contemplated gluing it back together but decided I would peel it off and sand it.  Turns out this gave it a more rustic industrial feel which I liked.

I worked at cleaning it up, peeling off the veneer and sanding it smooth.  When I took a closer look at the spindle in the center, I realized it would have to be replaced.  I had a really great and rustic timber in the workshop that would be perfect to use as a support between the two curved leg pieces.  I removed the dowel and attached the new/old timber after cutting it to size.

The door/tabletop didn't take much work at all...just a light sanding down.  I fixed the door on top of the base and put some stain on the whole thing.  A final coat of tung oil and it was finished.  I had left some of the door hardware on to add interest.  All it needs is a piece of glass to use as a smooth surface.

Here is the finished product......I think it looks great and so did my client!


Here it is with the glass on top in their dining room.

I love the fact that a cast off door and table that might have ended up in a landfill somewhere can have a new life in someone's home!